So you´re using the Wordfence plugin to secure your WordPress website and suddenly you were locked out. Probably you made the same mistake as I did and set the security level in the plugin options to “Level 4: Lockdown”, the name should be a warning but I selected level 4.
Unlocking your website is easy as long as you have access to the files (via FTP for example) and to the database (PHPMyAdmin in my case).
1.- Change the name of the Wordfence directory
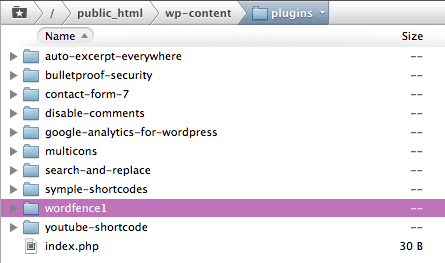
First access your plugins directory located in root/wp-content/plugins/… and you’ll find a directory called “wordfence”. Just change the name of that directory, for example I changed it to “wordfence1”. That will deactivate the plugin thus unlocking your website.

2.- Drop the Wordfence tables in your database
Now, DON’T activate the plugin again or you will be locked out again, first you must erase the plugin’s configuration/data. You can do this in your database, I use PHPMyAdmin. Before making anything else backup your database exporting it as a file to your computer. Now that you have a backup in case anything goes wrong all you have to do is delete (drop) the database tables used by Wordfence, you can identify them because their names all start with “wp_wf”. Just select all tables with names starting with wp_wf and drop them.

3.- Reactivate the Wordfence plugin
Go to your website (the front-end) and verify that everything is working correctly. If everything is fine you can reactivate the wordfence plugin now by changing its name again to “wordfence” in you plugins directory we visited in step 1. If something went wrong just use your database backup.
4.- Reset the plugin’s data
Now let’s go to your WordPress dashboard and – OH My! some errors! –. Easy, this is expected to happen as the Wordfence plug-in is trying to retrieve data from its database tables but they dont exist anymore. Just go to your Plugins section in WordPress, deactivate the Wordfence plug-in and activate it again, this will let the plugin create new database tables and get a new API key. There, now just configure the plug-in again with security level number 2 and your good to go.

